by Gordie Elwell
I’m sure that was on the minds of fledging photographers shooting and developing their own images in the latter half of the 19th Century. After all, there is black, white, and a seemingly infinite number of shades of grey in between. Why complicate things with color?
Well as we all know, the demanding audiences of the world wanted color images, so the color photography genera was born. Easy enough, right? Wrong! It soon became clear that there were many different color temperatures out there. Who knew? Today I will discuss what color temperatures are, and why we should care.
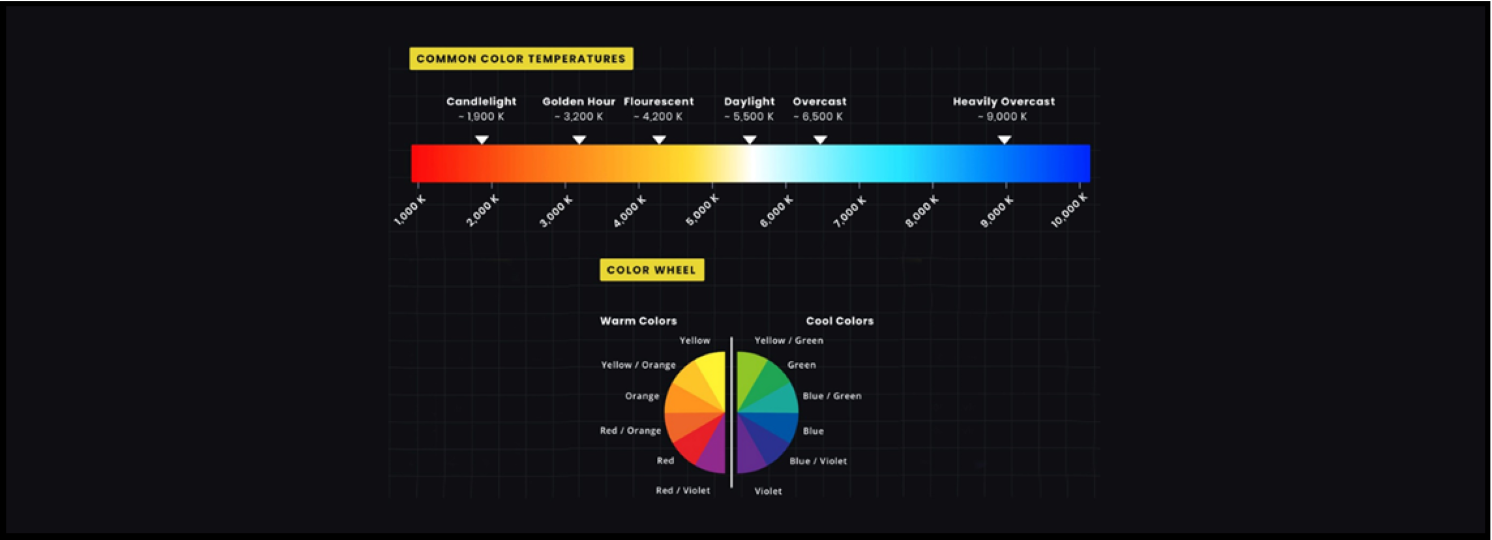
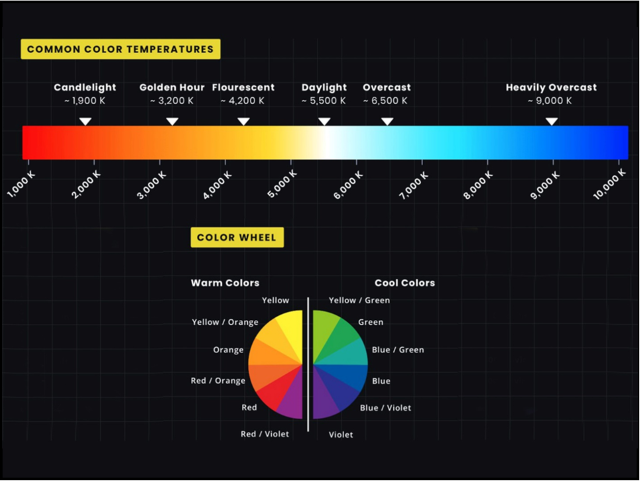
In our everyday world, the scenes and objects are lit by many different sources of light. From that romantic dinner with candle light to that backyard scene under clear blue skies. Our eyes see the scene, and send the signal to the brain what exactly what we are looking at. But our brain is smarter than we are, so it compensates for the varying temperatures of the light sources and we don’t even notice (too much anyway), the different light temperatures. (See Fig 1)
Our cameras are a different story altogether. The sensors (or film being used) can only “see” the scene as it is lit by the light source. When we then look at the results, sometimes we see images with distorted colors. There is no brain to interpret and display the scene as we expect it to be. Or is there?
Nearly all of our digital cameras have a “White Balance” setting where we can instruct the sensor to capture the scene with the color temperature of the light source. However, this would require us to become “experts of sorts” on the light source color temperatures. Instead, nearly all digital cameras now have a menu option for “Auto White Balance” (AWB). (This is the digital camera world equivalent of our brain sorting out what color temperatures are lighting the scene) Over 90% of the time this feature gets us an exposure with the correct color temperature assigned to the image. If for some reason you find the AWB gives you wonky color tints, you can then choose a different setting. Many cameras have a selection of presets that assign the white balance for the most common scenes. A few might be “overcast skies”, “incandescent”, “tungsten”, etc. You could select whichever one most closely matches the lighting source on your scene. The most basic measurement is the color of the light source in degrees Kelvin. This is a measure of the color temperature of the light source, and if you know it precisely, you can usually dial it in to the “White Balance” menu selection under the manual options. This is WAY beyond any settings I would ever use, mainly because of the complexity. I normally just select AWB and then apply the TLAR method in post processing. More on that later.
In shooting your scene, you have the option of what file format to save the image. Although JPEG uses far less space on your memory card, it also severely restricts your post processing options. A JPEG file lets your camera (and your menu selections) decide which are the best for your image, then saves the file with those settings and throws out all the other data associated with the scene. This is why the JPEG files are so much smaller. You have probably figured out by now that JPEG files are very limited in what adjustments you can make in post processing.
If you shoot and save your images using your camera’s RAW file format, all that data that was “thrown away” when saving a JPEG file is retained in the RAW file. (This is why RAW files are so much larger) All that data (including color temperature of the light source) can then be manipulated when post processing your image. No matter what program you use, they have a “slider” (or other method) to adjust the color temperature of your image. (See Fig 2)

This adjustment, along with using the AWB selection on your camera, will give you the correct white balance 99% of the time. However, there are other advantages in adjusting in post processing (which is why I very strongly recommend shooting in RAW). For example, your image may very accurately capture the scene, but you emotionally remember it differently. For example, you may remember your backyard portrait of a family gathering with more warmth than the cold (but accurate) depiction of your image. With a RAW file and the white balance adjustment, you can “warm up” the color temperature giving you a portrait that looks much more natural and happy to you.
This is where the TLAR technique comes into play. TLAR stands for “That Looks About Right”. When your image is loaded into your favorite processing program, you can slide the “White Balance” slider (and others) to get your image to look just the way you want . . . in other words, “that looks about right”.
Some references for expanded awareness:
https://learn.zoner.com/mastering-colors-photography-white-balance
Very impressed with the stability of the site. No lags or crashes even during peak hours. It makes the whole gaming experience much more relaxing. cyl88login
I was worried about the security but this site is solid. The login is fast and I feel my data is safe here. Glad I found alpha66login.
This app has changed the way I bet. The notifications are timely and the layout is clean. If you are looking for a reliable app then 4868betapp is the way to go.
Feels just like being in a real casino but from the comfort of my home. The graphics are stunning. I am a loyal fan of clroyalvegas now.
Really impressed with the customer support team. They solved my issue in minutes. Definitely sticking with myecwon
One of the most trusted sites in the PH right now. Payouts are fast and the variety of games is insane. 777pubph is awesome